vue3新特性,node多版本管理工具nvm和nrm的使用

vue3

从前实习做的项目和自己做的项目基本上都是vue2版本

到目前,vue3版本已经很成熟了,很多公司也都开始使用上了vue3,那么我也去学习一下吧

新特性

vue3的双向绑定是基于proxy实现,与vue2的defineProperty不同

1:祛除了麻烦的for in 循环遍历监听

2:可以监听复杂对象变化

3:代码简化:

4:可以监听删除的属性和数组长度索引

vue3对VDOM进行了更新,对文本节点等内容进行标记,更新只对比想同类型节点,不同于vue2全局diff

vue3支持多根节点

同时支持render JSX写法

支持多v-model

支持tree-shaking

componsition-api也就是vue3-hook

配置开发环境

1
2
3
4
5
6
npm init vite@latest //注:npm 和 yarn的用法不同 //之前看过一些vite,命令都不一样
npm i
vite是通过script type="module"的方式进行构建
因此比传统的webpack启动服务更快
修改一小块内容,只是对那一部分内容进行刷新,而不是全部刷新
基于rollup

nvm

对node进行版本管理的工具

1
2
3
4
5
6
7
8
建议先弄个梯子,不然github都进不去
下载.exe文件安装
安装目录名不要有中文字符
nvm list //查看当前nvm使用的node版本集
nvm list available //查看所有node版本
nvm install 版本号//安装对应node版本 需要修改nvm安装目录下的setting文件,将包源切换为淘宝,不然除非科学上网,否则很难成功下载node
nvm use 版本号//使用某个版本的node,记得命令行使用管理员权限打开
nvm uninstall 版本号//卸载某个版本的node

nrm

切换源的工具

1
2
3
nrm ls //展示源列表
nrm use 源 //使用某源
nrm test npm/taobeo/...... //测试速度

vetur和volar

vetur是vue2时辅助开发的插件,但是vue3不适用,语法不同,如果使用vue2,则需要禁用volar,反之亦然

模板语法和指令

1
2
3
4
5
6
7
8
9
10
11
12
13
14
15
16
模板语法
const mes:syring = 'my name'
{{ name }}
花括号中可以写三元表达式,运算等等

指令
v-text
v-html
v-if
v-else-if
v-else
v-show
v-on/@
v-model
v-bind/:
v-for

虚拟dom和diff算法

虚拟dom:通过js来生成一个AST节点树

1
算了算了,懂懂概念还行,写就算了

ref全家桶

1
2
3
4
5
6
7
8
9
10
11
12
13
14
15
16
17
18
19
20
21
22
23
24
25
26
27
28
29
30
31
32
33
34
35
36
37
38
import { ref,Ref } from 'vue'
const mes:Ref<string> = ref('')
mes经过ref包装后,成为了响应式的对象,需要通过mes.value取值

isRef // 判断是否是ref对象
console.log(isRef(mes))

shallowRef //创建一个跟踪自身.value变化的ref,单内部属性不会变成ref
const mes = shallowRef({name:'hao'})
const btnClivk = () => {
mes.value.name = '123' //无效
mes.value = {name:'123'} //有效,内部属性不是响应式
}

triggerRef //强制更新
const mes = shallowRef({name:'hao'})
const btnClivk = () => {
mes.value.name = '123' //无效
triggger(mes) //有效,强制更新
}

customRef //自定义ref
function myRef<T>(value:T){
return customRef((trank,trigger)=>{
//trank为依赖
return {
get(){
trank()
return value
},
set(newValue:T){
value = newValue
trigger()
}
}
})
}
let mes = myRef<string>('123')

shallowRef造成视图更新的问题……

1

reactive全家桶

1
2
3
4
5
6
7
8
9
10
11
12
13
14
15
16
17
18
19
20
21
22
23
24
25
26
27
28
29
import { reactive } from 'vue'
let mes = reactive([]/{}) //只接收复杂类型对象,如果插入简单数据类型,会提示错误,源码做了类型限制
T extends object,只能是对象,又利用了isObject判断

ref适用于基本类型
reactive适用于复杂类型
修改ref数据需要xxx.value = ''
reactive则不需要 xxx.name = '123'
//注,ref底层转换响应式使用了reactive

reactive数据不能直接赋值,会破坏响应式
解决方式:可以使用ref定义,或者定义一个reactive对象,内部属性是响应式

readonly
let mes = ref('mes')
let copy = readonly(mes)
copy.value = '123' //不允许,只读

shallowReactive
只能动浅层的数据,如果是深层的数据只会改变值,不会改变视图
let mes = shallowReactive({
test:'123',
people:{
friends:{
name:'',
age:''
}
}
})

toRef,toRefs,toRaw

1
2
3
4
5
6
7
8
9
10
11
12
13
14
15
16
17
18
19
toRef
如果原始数据没有经过reactive包裹,那么通过toRef转换的数据内部值修改,视图不更新
const obj = {name:'hao'}
const state = toRef(onj,'name')
state.value = 'ge'

toRefs
let obj = reactive({
name:'hao',
age:21
})
let {name,age} = toRefs(obj) //通过toRefs结构出来的数据变成响应式,否则失去响应式

toRaw //转换非响应式对象
let obj = reactive({
name:'hao',
age:21
})
let copy = toRaw(obj)

computed计算属性

1
2
3
4
5
6
7
8
9
10
11
12
13
14
const age = computed(()=>{
return 21
})

const age = computed({
get(){
return 123
},
set(){
123
}
})

具有缓存

watch侦听器

1
2
3
4
5
6
7
8
9
10
11
12
13
14
15
16
17
18
19
20
21
22
23
24
25
26
27
28
29
30
31
32
33
34
35
36
37
38
39
40
41
42
let mes = ref<string>('hao')
watch(mes,(oldValue,newValue)=>{
console.log('旧值',oldValue)
console.log('新值',newValue)
})
@click = () => {
mes.value = '123'
}

支监听多个
let mes = ref<string>('hao')
let mes2 = ref<string>('hao2')
watch([mes,mes2],(oldValue,newValue)=>{
console.log('旧值',oldValue) //打印出来同为数组
console.log('新值',newValue) //打印出来同为数组
})

深度监听
let mes = ref({
nav:{
name:{

}
}
})
watch(mes,(oldValue,newValue)=>{
console.log('旧值',oldValue) //打印出来同为数组
console.log('新值',newValue) //打印出来同为数组
},{
deep:true, //深层次监听,如果用ref定义复杂类型则需要使用这个,如果使用reactive则不需要
immediate:true //页面最开始加载调用一次
})

只监听某个数据
let mes = reactive({
name:'123',
name2:'232'
})
只监听单一项
watch(()=>mes.name,(old,value)=>{

})

watchEffect

1
2
3
4
5
6
7
8
9
10
11
12
13
14
15
16
17
18
19
20
21
22
23
24
25
26
27
28
29
30
31
32
33
高级侦听器,非惰性,进入页面自动调用,全部监听
watchEffect(()=>{
console.log(mes.name)
})

监听之前需要做什么
watchEffect((oninvalidate)=>{
oninvalidate(()=>{
console.log('先执行该回调,处理一些事情')
})
console.log(mes.name)
})

停止监听
const stopWatch = watchEffect((oninvalidate)=>{
oninvalidate(()=>{
console.log('先执行该回调,处理一些事情')
})
console.log(mes.name)
})
@click = () => stopWatch() //停止


额外配置选项
watchEffect(()=>{
//如果在此处访问dom,非惰性的原因会返回null
console.log(mes.name)
},{
flush:"post", //dom加载完后再读取dom
onTrigger(e){ //调试
debugger
}
})

组件和生命周期

1
2
3
4
5
import Hello from '..'
<Hello/> 3.2 引入无须在components里注册就能使用

生命周期
setup,onBeforeMount,onMounted,onBeforeUpdate,onUpdated,onBeforeUnmount,onUnmounted

less,scoped

1
2
3
npm install less less-loader -D
scoped //单页面应用保证同类样式不冲突
使用了data-v-xxx,样式修改为属性选择器

父子组件传参

1
2
3
4
5
6
7
8
9
10
11
12
13
14
15
16
17
18
19
20
21
22
23
24
25
26
27
28
29
30
31
32
33
34
35
36
37
38
39
defineProps
写法1
:title=""
defineProps({
title:{

}
})
写法2
type Props = {title:string}
defineProps<Props>()

defineEmits
子组件
const emit = defineEmits(['emitMes'...//可以配置多个事件])
@click = () => {
emit('emitMes',params)
}

父组件
@emitMes="emitmes"
const emitmes = (value) => {
console.log(value)
}

defineExpose
子组件
const mes = ref('hao')
defineExpose({
mes
})
父组件能通过在子组件标签上添加ref的方式获取子组件暴露出来的变量

如果希望props有默认值
type Props = {title:string}
defineProps<Props>()
withDefaults(defineProps<Props>(),{
title:'我是默认值'
})

全局组件,局部组件,递归组件

1
2
3
4
5
6
7
8
9
10
11
12
13
14
全局
import XXX from ''
app.component('名字',XXX) //main.js / main.ts 不能跟随在mount后面进行链式调用

局部
。。。。。。

递归
方法1:
我引入我自己 //虽然成功但是会有提示警告
放发2:
再添加一个script,export default {name:''}
利用这个name作为组件名称

动态组件

1
2
3
4
5
6
7
8
9
import A from './'
import B from './'
<component :is="A">
v3的is只能传组件不能传字符串,v2可以传字符串
markRaw,为对象添加_v_skip,true时跳过
const coms = [{
name:"A",
comName:markRaw(A) //组件是无需代理的,需要用markRaw包裹
}]

插槽全家桶

1
2
3
4
5
6
7
8
9
10
11
12
13
14
15
16
17
18
19
20
21
22
23
24
25
26
27
28
29
30
31
32
33
34
35
36
37
38
39
40
41
42
43
44
45
46
47
48
49
匿名插槽
子组件
<slot></slot>
父组件
<子组件名>
<template v-slot>
我是插入的内容
</template>
</子组件名>

具名插槽
子组件
<slot name="A"></slot>
<slot name="B"></slot>
父组件
<子组件名>
<template v-slot:A>
我是插入A的内容
</template>
<template v-slot:B>
我是插入B的内容
</template>
//也可简写#===v-slot
<template #B>
我是插入B的内容
</template>
</子组件名>

作用域插槽
<slot name="A" :title="mes"></slot>
<子组件名>
<template v-slot:A="{title}">
我是插入A的内容{{ title }}
</template>
</子组件名>

动态插槽
<slot name="A"></slot>
<slot name="B"></slot>
<子组件名>
<template #[name]>
我是插入的内容
</template>
</子组件名>

const name = ref('A') //插入A
@click = () => {
name.value = 'B' //点击后插入B
}

异步组件,代码分包,suspense性能优化

1
2
3
4
5
6
7
8
9
10
11
12
13
14
15
16
17
18
19
20
异步组件
defineAsyncComponent
demo:如果A组件是根据异步返回的数据v-for生成,那么视图不会更新,需要使用defineAsyncComponent
const A = defineAsyncComponent(()=>import('./A.vue'))
<Suspense>
插槽1:
<template #default>
<A/>
</template>
插槽2:在异步加载组件之前可以做点什么
<template #fallback>
<div>
Loading
</div>
</template>
</Suspense>

代码分包
通过异步组件使代码build后拆分文件,被单独打包
suspense

teleport传送组件

1
2
3
4
5
将模板渲染至指定DOM节点,不受父级style,v-show影响。但是data,prop数据依旧共用的技术
类似于react的Portal
<teleport to="body/.class/#id"> //to=?? 指定传送位置
<div>我是需要传送的内容</div>
</teleport>

keep-alive缓存组件,源码解析

1
2
3
4
5
6
7
8
9
10
11
12
13
14
15
16
17
不希望组件重复渲染,节省性能
include //缓存什么组件,如果无效可能是需要导出组件name
exclude //不缓存什么组件
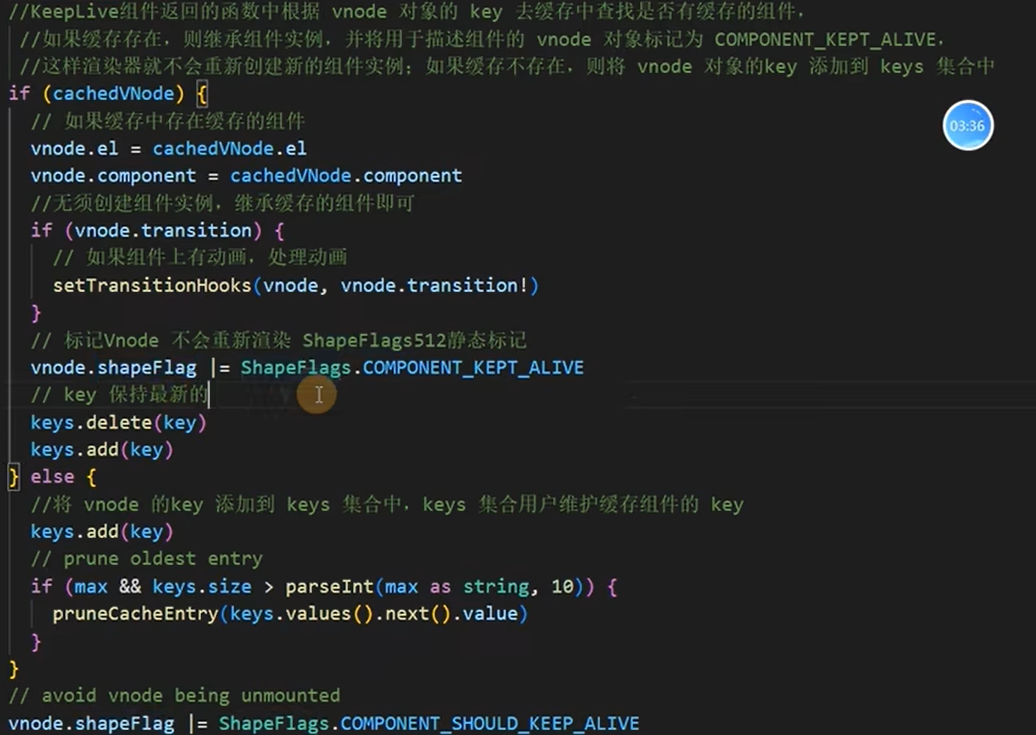
max //最大缓存多少个组件,优先不缓存使用频率低的组件,而不是根据顺序
<keep-alive :include="['A']"> //只缓存A组件
<keep-alive :exclude="['A']"> /不缓存A组件
<A/>
<B/>
</keep-alive>

新增生命周期v3,v2是actived和deactived
onActived //keep-alive初始化
onDeactived //keep-alive组件切换卸载


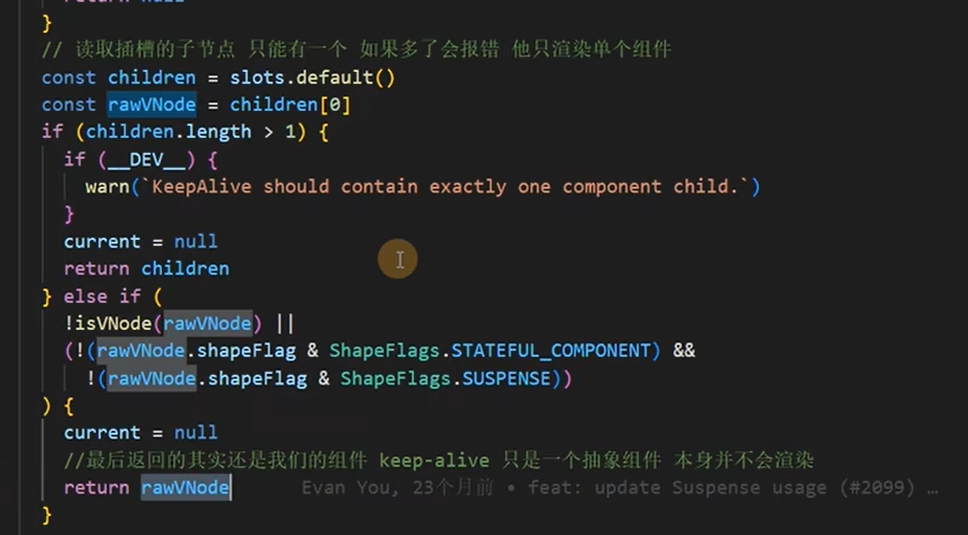
keep-alive内部只能有一个根节点
源码中对插槽做了判断

缓存机制,map结构,判断key

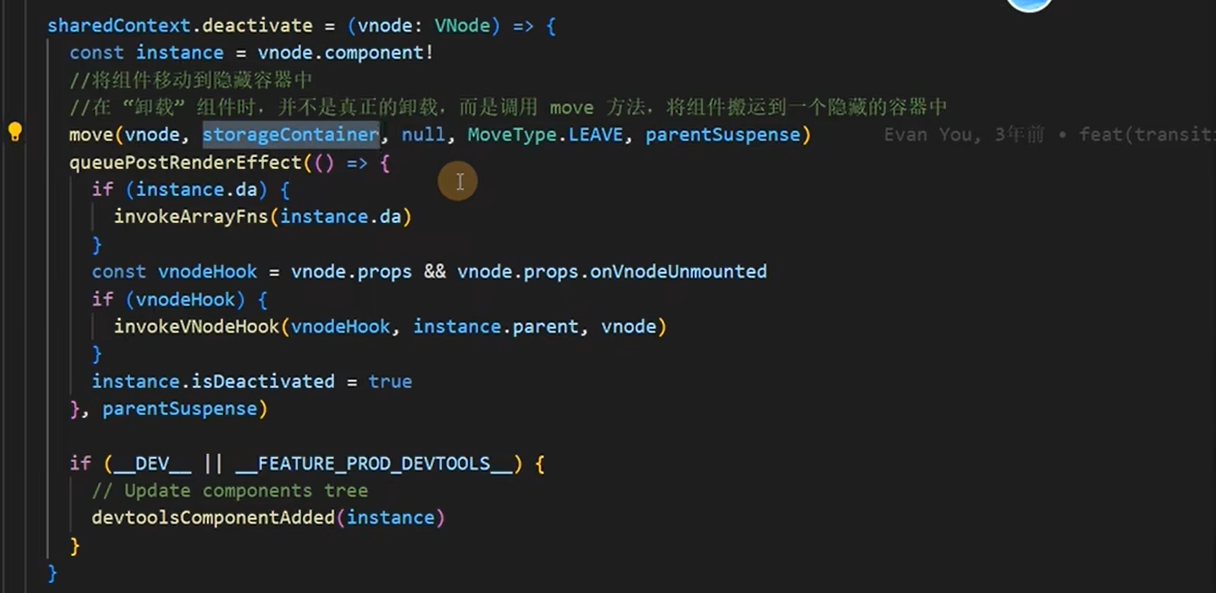
组件也不是真正卸载

transition动画组件

1
2
3
4
5
6
7
8
9
10
11
12
13
14
15
16
17
18
19
20
21
22
23
24
25
26
27
28
29
30
31
<transition name="animatename">
<A/ v-if="flag">
</transition>
@click = () => {
flag.value = !flag.value //隐藏与显示切换太过生硬
}

style中 //vue提供的类名
.animatename-enter-from{
width:0px;
height:0px
}
.animatename-enter-active{
transition:all 1.5s ease
}
.animatename-enter-to {
width:200px;
height:200px
}

.animatename-leave-from{
width:200px;
height:200px
}
.animatename-leave-active{
transition:all 1.5s ease
}
.animatename-leave-to {
width:0px;
height:0px
}

transition组件结合animate.css

1
2
3
4
5
6
7
8
9
10
11
自定义class
enter-from-class="" enter-avtive-class="" enter-to-class=""
leave-from-class="" leave-active-class="" leave-to-class=""
duration配置其他属性 动画持续时长
duration="500" //动画持续时长 500毫秒
duration={enter:"500",leave:"500"}

结合animate.css
npm install animate.css
import 'animate.css'
animate.css官网赋值类名为transition标签添加

transition生命周期和GSAP

1
2
3
4
5
6
7
8
9
10
11
12
13
14
15
16
17
18
19
20
21
22
23
24
25
26
27
28
29
30
31
32
33
34
35
36
37
38
@before-enter="enterFrom" //对应enter-from
@enter= //enter-active
@after-enter= //enter-to
@enter-cancelled= //显示过渡打断
@before-leave= //leave-from
@leave= //enter-active
@after= //leave-to
@leave-cancelled= //离开过渡打断

const enterFrom = (el:Element) => {
进入之前
}

npm install gsap -D //动画库
import gsap from 'gsap'
const enterFrom = (el:Element) => {
gsap.set(el,{
width:0,
height:0
})
}

const enterActive = (el:Element,done:gasp.CallBack) => {
gsap.to(el,{
width:200,
height:200,
onComplete:done
})
}

const leave = (el:Element,done:gasp.CallBack) => {
gsap.to(el,{
width:0,
height:0,
onComplete:done
})
}

transition的Appear属性

1
2
3
4
5
6
7
<transition 
appear
appear-from-class=""
appear-active-class=""
appear-to-class="">

</transition>

transitionGroup

1
2
3
4
5
6
7
8
9
10
11
12
13
const list = reactive([1,2,3,4])
<transition-group //添加动画属性和transtion相同>列表动画
<div v-for="item in list" :key="item">
{{ item }}
</div>
</transition-group>

const add = () => {
list.push('x')
}
const delete = () => {
list.pop()
}

平滑过渡动画

1
2
3
4
5
6
7
8
9
flip动画库
lodash制作随机数
let list = [数字们]
nom install lodash -D
npm install @types/lodash -D
import _ from 'lodash'
@click = () => {
list.value = _.shuffle(list.value) //变换数字排序
}

状态过渡

1
......

依赖注入provide,inject

1
2
3
import {provide,inject} from 'vue'
provide('mes',mes) //发送
const mes = inject('mes') //接收

兄弟组件传参

1
2
3
4
5
6
7
8
9
10
11
12
13
14
15
16
17
18
19
20
21
22
23
24
25
26
27
28
29
30
31
32
33
34
35
36
37
38
39
40
41
42
43
44
45
46
47
48
49
50
51
52
53
54
55
利用父组件传参,每次都要在父组件处理,麻烦
A
@click = () => {
emit('change',true)
}
B
defineProps({
flag,
})
父组件
<A @change="change"/>
const flag = ref(false)
const change = (value) => {
flag.value = value
}
<B :flag="flag"/>

eventBus
封装的bus.ts
type BusClass {
emit:(name:string)=>void
on:(name:string,callback:Function)=>void
}

type PramsKey = string | number | symbol

type List = {
[key:PramsKey]:Array<Function>
}

class Bus implements BusClass {
list:List
constructor(){
this.list = {}
}
emit(name:string,...args:Array<any>){
let eventName:Array<Function> = this.list[name]
eventName.forEach(fn => {
fn.apply(this,args)
})
}
on(name:string,callback:Function){
let fn:Array<Function> = this.list[name] || []
fn.push(callback)
this.list[name] = fn
}
}

export default new Bus()

import bus from '//'
bus.emit('xx',123)
bus.on('xx',(value)=>{
console.log(value) //123
})

Mitt

1
2
3
4
5
6
7
8
9
10
11
12
13
14
15
16
17
18
19
20
21
22
23
24
25
26
27
28
29
30
31
32
33
34
35
36
37
38
39
40
41
42
Mitt是封装的eventBus库
npm install mitt -S

局部注册 //不带ts
import mitt from "mitt";
const emitter = mitt();
export default emitter

全局注册 main.ts
import mitt from 'mitt'
consyt Mitt = mitt()
需要使用ts
declare module 'vue' {
export interface ComponentCustomProperties {
$Bus:typeof Mitt
}
}
app.config.globalProperties.$Bus = Mitt

页面中使用
全局注册时
import { getCurrentInstance } from 'vue'
const instance = getCurrentInstance()
instance?.proxy?.$Bus.emit('xx',123) //其他页面使用也这样

局部注册
import bus from '....'
bus.$emit()
bus.$on()

监听多个事件
bus.$emit('A')
bus.$emit('B')

bus.$on('*',(type,str)=>{
console.log(type,str) //打印出事件名和参数
})

取消指定事件
bus.$off('xx')
取消所有指定事件
bus.all.clear()

TSX

1
2
3
4
5
之前使用的是template模板格式
npm install @vitejs/plugin-vue-jsx
配置太多,手敲太麻烦了,就附带一张长图展示vue使用tsx的配置和注意事项,跟着一步一步来就可以
图片最下方有该博主的账号名

ref等api自动引入插件

1
2
npm install unplugin-auto-import -D
配置百度查看,嘻嘻嘻

v-model深入

1
2
3
4
5
6
7
8
9
10
11
12
13
14
15
16
17
18
19
20
21
22
23
24
25
26
27
28
29
30
31
32
33
34
35
36
37
v-model是一个语法糖,是结合了props和emit而成
默认值的改变:
prop: value => modelValue
demo:控制dialog组件显示与隐藏
const flag = ref(true)
@click = () => {
flag = !flag
}
<Dialog v-model="flag"/>
组件内
defineProps({
modelValue,
})
v-if="modelValue"

事件:input => update:modelValue
const emit = defineEmits(['update:modelValue'])
emit('update:modelValue',123)

v-bind的.sync 修饰符和组件的model选项已经移除

新增支持多个v-model
v-model:title="123"

新增支持自定义修饰符
v-model:hao=""
v-model:title.aass="title"
const props = defineProps({
[绑定属性名]Modifiers?:{
hao:string
}
})
@click = () => {
if(props. [绑定属性名]Modifiers?.hao){
do some thing
}
}

自定义指令

1
2
3
4
5
6
7
8
9
10
11
12
13
14
15
16
17
18
19
20
21
22
23
24
25
26
27
28
29
30
31
32
33
34
35
36
37
38
39
40
41
42
43
44
45
46
47
48
49
50
51
52
53
54
55
56
57
58
59
60
61
62
63
64
65
66
67
68
69
70
71
72
73
74
75
76
77
78
79
80
81
82
83
84
div v-dir="123"
const vDir = {
created(){
console.log('created')
},
beforeMount(){

},
mounted(...args:Array<any>){
//可以获取一系列信息,节点,值,修饰符等
console.log(args)
},
beforeUpdate(){

},
updated(){

},
beforeUnmount(){

},
unmounted(){

}
}

简写
const vDir = (el,binding) => {

}

小demo,拖拽命令


<template>
<div v-move class="box">
<div class="header">

</div>
<div class="content">
内容
</div>
</div>
</template>
<script setup lang="ts">
import { ref ,reactive,Directive,DirectiveBinding} from 'vue';
const vMove:Directive<any,void> = (el:HTMLElement,bingding:DirectiveBinding) => {
let moveElement:HTMLDivElement = el.firstElementChild as HTMLDivElement
const mousedown = (e:MouseEvent) => {
let X = e.clientX - el.offsetLeft
let Y = e.clientY - el.offsetTop
const move = (e:MouseEvent) => {
el.style.left = e.clientX - X + 'px'
el.style.top = e.clientY -Y + 'px'
}
document.addEventListener('mousemove',move)
document.addEventListener('mouseup',()=>{
document.removeEventListener('mousemove',move)
})
}
moveElement.addEventListener('mousedown',mousedown)
}
</script>
<style scoped>
.box {
height: 500px;
width: 400px;
position: relative;
left:200px;
top: 300px;
}
.header {
width: 100%;
height: 60px;
border: 1px solid #ccc;
line-height: 60px;
}
.content {
width: 100%;
height: 400px;
border: 1px solid #ccc;
}
</style>

自定义hooks

1
2
3
4
5
6
7
8
9
10
11
12
与v2mixin很像,mixin含有的问题,生命周期调用的比组件快
开源库vueUse,hook库
import { useAttrs } from 'vue' //是一个收集props的hook
let attrs = useAttrs()
console.log(attrs)

export default function () {
return 123
}

import useXX from '..'
const xx = useXX()

全局函数和变量

1
2
3
4
5
6
7
8
9
10
11
12
13
14
15
16
17
18
19
vue3不能在原型上挂载,要修改方式
定义时 //vue3移除了fillter,定义一个$filters过滤器,带ts
app.config,globalProperties.$filters = ()=> {
format<T>(str:T):string{
return `过滤器${str}`
}
},
app.config,globalProperties.$env = '1232'
type Filter = {
format:<T>(str:T)=>string
}
declare module '@vue/runtime-core' {
export interface ComponentCustomProperties {
$filters:Filter,
$env:string
}
}
使用时
{{ $filters.format('123') }}

自定义vue插件

1
2
3
4
5
6
7
8
9
10
11
12
13
14
15
16
17
18
19
20
21
22
23
24
25
26
27
28
插件是自包含的代码,通常是向Vue添加全局功能,如果是一个对象需要install方法Vue会帮助自动注入install方法,如果是function就可以直接当install使用
在createApp之后通过use()添加插件

index.ts
import { App , createVNode,render} from 'vue'
import Loading from '...'
export default {
install(app:App){
const vnode:VNode = createVNode(Loading)
render(vnode,document.body)
app.config.globalPropertiees.$loading = {
show:vnode.component?.exposed?.show,
hide:vnode.component?.exposed?.hide,
} 。//需要先defineExpoed暴露出

}
}

main.ts
import Loading from 'loading.ts'
app.use(Loading) //如果使用ts需要声明

使用:
import { getCurrentInstance,ComponentInternalInstance } from 'vue'
const { appContext } = getCurrentInstance() as ComponentInternalInstance
// 听说 const { proxy } = getCurrentInstance()可以直接获取到全局方法
appContext.config.globalProperties.$loading.show()
appContext.config.globalProperties.$loading.hide()

elementUI

1
2
具体看官网

样式穿透:deep()

1
2
3
4
5
vue3
style中
:deep(eleUI的样式类名){

}

css完整新特性

1
2
3
4
5
6
7
8
9
10
11
12
13
14
15
16
17
18
19
20
21
22
23
24
25
26
27
28
29
30
31
32
33
34
35
36
37
38
39
40
41
42
43
44
45
46
47
48
49
50
51
52
53
54
55
除开:deep
插槽选择器和全局选择器
插槽选择器
:slotted(插槽内节点类名){

}

全局选择器
原本直接在app.vue中修改样式就是全局样式,但是vue3提供了一个优雅的写法
:global(div){

}

动态css和cssmodule
动态css
const color = ref('red')
div{
color:v-bind(color)
}

如果是对象
const color = ref({
colorStyle:''
})
div{
color:v-bind(color.colorStyle) //不能直接.需要修改成color:v-bind('color.colorStyle')字符串形式
}

cssmodule
<style module>
.div {
color:red
}
.di {
border:1px solid red
}
<style>

使用时
<div :class="[$style.div,$style.di]"/>

也可
import { useCssModule } from 'vue'
const css = useCssModule('style')
console.log(css)

<style module="style">
.div {
color:red
}
.di {
border:1px solid red
}
<style>
//改写法比较适用于tsx,jsx写法

vue3集成TailWindCss

1
2
3
TailWindCss是一个js编写的css框架,基于postCss解析
postCss是一个js编写的使用js工具和插件转换CSS代码的工具
下方截取了其他博主的博客教程,一步步配置即可

EventLoop

1
2
3
4
5
6
7
8
9
10
11
12
13
14
15
16
17
18
19
事件循环机制
js是单线程的,如果是多线程的话,同一时间会操作多个dom,增加或者删除,单线程意味着所有的任务都要排队,如果前面的任务耗时长,那么后续任务就会卡住,影响用户体验,因此出现了异步的概念//HTML5已经支持多线程webWorker,但是不能操作dom

同步任务
代码从上到下执行

异步任务
Promise是同步的

宏任务
script,定时器,ajax,UI交互

微任务
promise.then,catch,finally,process.nextTick

运行机制
所有同步任务都是在主线程形成执行栈,主线程之外还有个任务队列,异步任务执行队列会先执行宏任务,然后清空宏任务中的微任务,再进行下一个tick形成循环
nextTick就是创建一个异步任务,会等待同步任务执行完以后再执行

nextTick,源码解析

1
2
3
4
5
6
7
8
9
10
11
12
更新dom内容后,访问还是之前的值
import { nextTick } from 'vue'
const mes = ref('1')
const div = ref(null)
@click = () => {
mes.value = '123'
}
await nextTick()
console.log(div.value.innerText) //正常情况打印应该是123,这里是1,因此需要nextTick

源码
迷惑后续看吧

vue开发移动,打包APP暂时跳过

1
暂时跳过......

unoCss原子化

1
2
3
4
5
6
7
8
9
什么是css原子化
减少css体积,提高css复用
减少起名复杂度
缺点:增加了记忆成本,势必要记住一些api
集合了tailwindcss和其他css框架

接入unocss //适用于vite,webpack是阉割版
npm i unocss -D

函数式编程和h函数

1
2
3
4
5
6
7
8
9
10
11
12
13
14
15
16
17
18
19
20
21
22
23
24
25
26
27
h函数底层,createVNode
h函数接收三个参数
type:元素类型
propsOrChildren:数据对象,表示props,attrs,dom props,class和style
chilren:子节点

h('div')
h('div',{ id:'foo'})

h('div',{class:'foo',innerHTML:'foo'})

const div = h(...) //创建,但是并未渲染到页面
render(div,document.body) //渲染插入body

type Props = {
text:string
}
const btn = (props:Props,ctx:any) => {
return h('div',{
class:[''],
onClick:()=>{
ctx.emit('on-click','123')
}
},{

})
}

vue3开发Electron桌面程序

响应性语法糖

1
都是实验性产物,想使用需要自己开启

配置用户代码片段

有个小妙招,可以自定义快捷代码片段
输入v3可以快速生成vue3代码片段模板
vscode点击左下角配置代码片段,搜索vue3,如果没有就新建一个,百度一下模板很多

环境变量

1
2
3
天天去别人博客扒图的我 //555
vite的话需要打印import.meta.env.得到环境变量相关信息
之前是打印的process,env...

pinia

1
2
3
4
5
6
7
8
9
10
11
12
13
14
15
16
17
18
19
20
21
22
23
24
25
26
27
28
29
30
31
32
33
34
35
36
37
38
39
40
41
42
43
44
45
46
47
48
49
50
51
52
53
54
55
56
57
58
59
60
61
62
63
64
65
66
67
68
69
70
71
72
73
74
75
76
77
78
79
80
81
82
83
84
85
86
87
88
89
90
91
92
93
94
95
96
97
98
99
100
101
102
103
104
105
106
107
108
109
110
111
112
113
114
115
116
117
118
119
120
121
122
123
124
125
126
127
128
129
130
131
132
133
134
135
替代vuex
完整ts支持
轻量,压缩体积只有1kb左右
去除mutation
actions支持同步和异步
npm install pinia -D --save

main.ts
import { createPinia } from 'pinia' //2和3版本不一样
const store = createStore()
app.use(store)

使用
新建store文件夹
import { defineStore } from 'pinia'
export const Test = defineStore('id',{
state:()=>{
return {
current:1,
name:'hao'
}
},
// 类似computed,具有缓存
getters:{

},
// 类似methods,同步异步都可以做
actions:{

}
})

引入页面使用
import { Test } from '...'
const test = Test()
<div>{{ test.name }}</div>


修改state方式
1:可以在页面直接
@click = () => {
text.name = 'xu'
}

2:通过pinia
@click = ()=> {
Test.$patch({
current:2,
name:'xu'
})
}

3:依旧是patch
@click = () => {
Test.$patch((state)=>{
state.current = 3
state.name = 'xu'
})
}

4:弊端,直接覆盖,必须修改整个对象
@click = () => {
Test.$state = {
current:4,
name:'ye'
}
}

5:action
actions:{
setCurrent(params){
this.current = 999 || params
}
}
@click = () => {
Test.setCurrent(//也可以传参123)
}

解构store
const { current,name } = Test
和reactive是一样的,解构失去响应式

解决方式
import { storeToRefs } from 'pinia'
const { current,name } = storeToRefs(Test)

源码是先将数据转换成toRaw
再判断赋予响应

getters和actions
actions支持同步和异步,可以相互调用

getters:{
newName():string{
return `$-${this.name}`
}
}

其他api
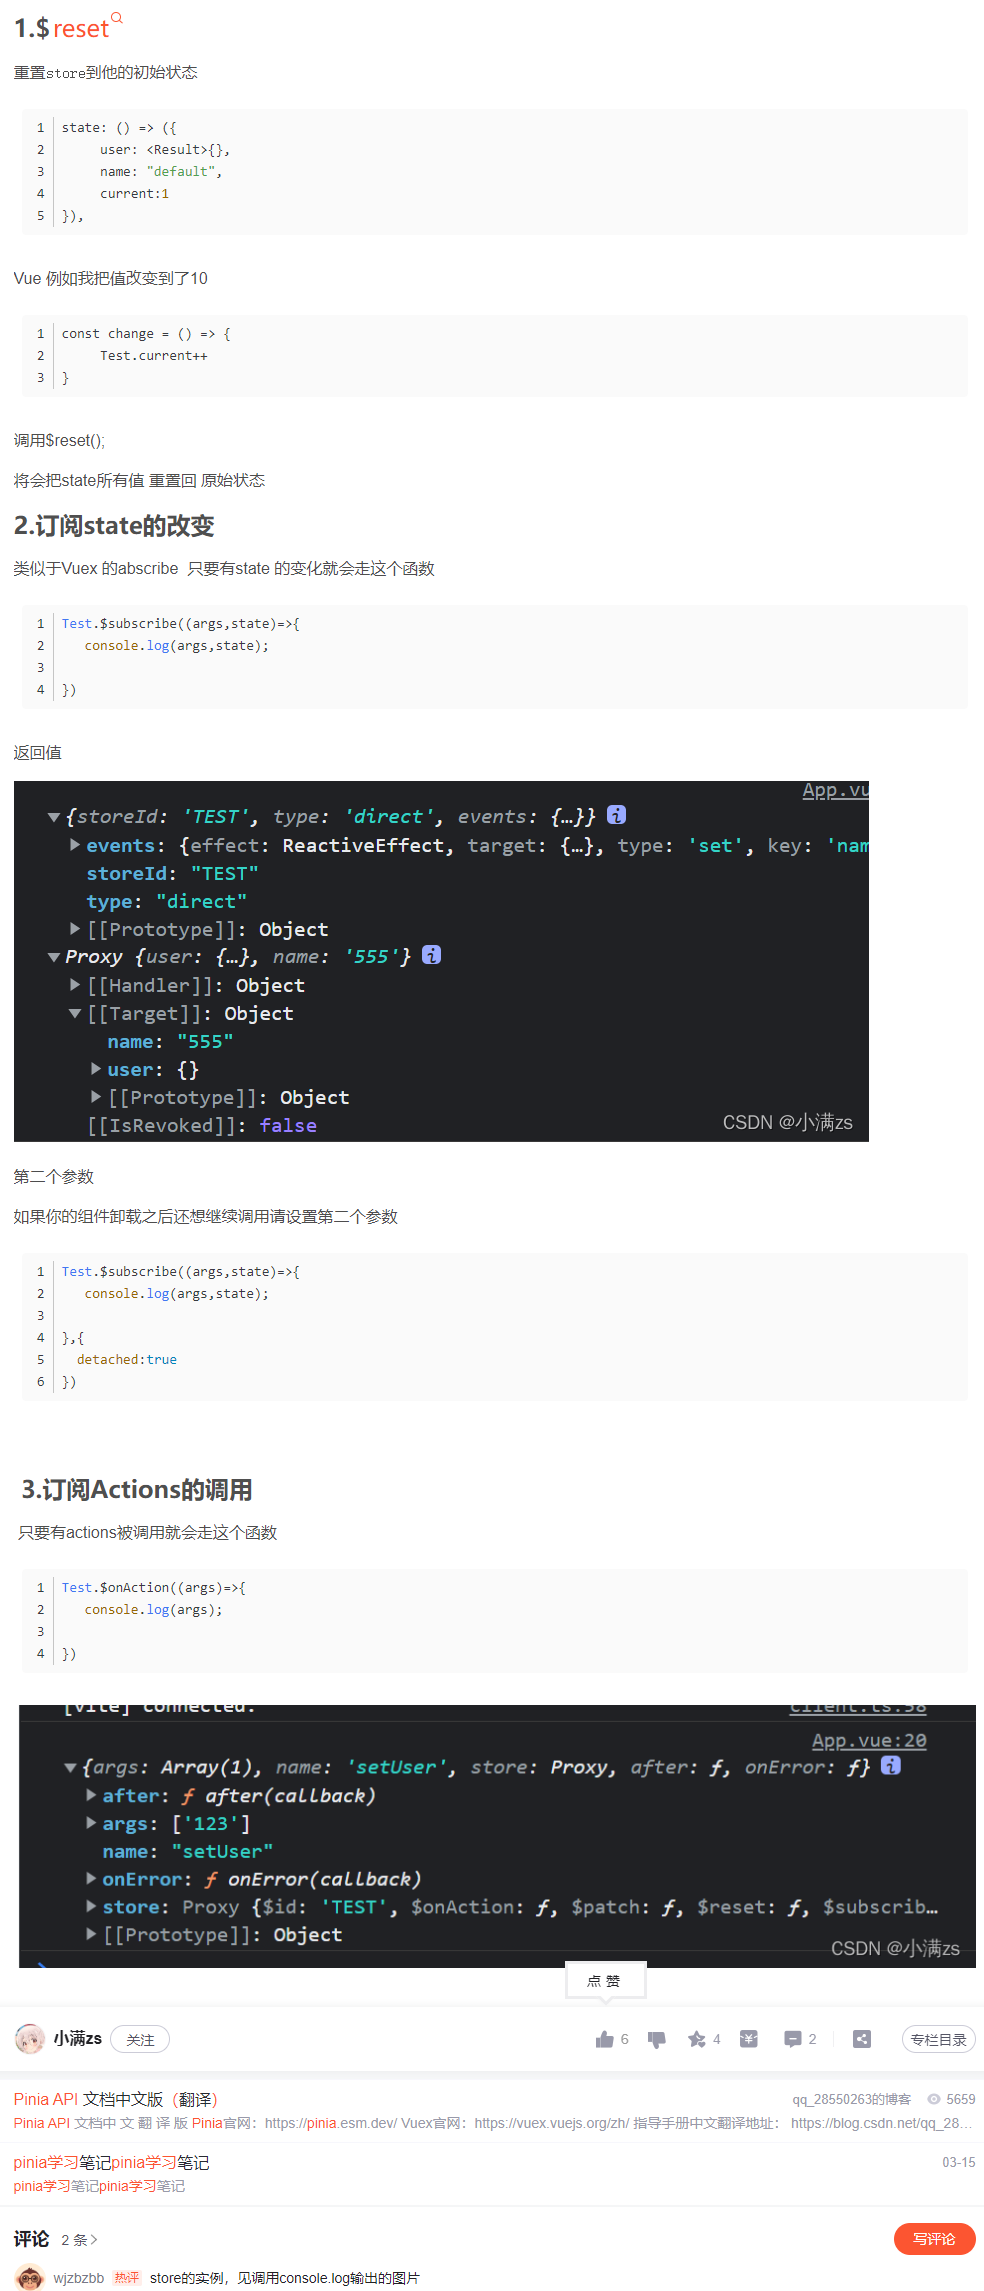
Test.$reset()
订阅state改变Test.$subscribe((args,state)=>{console.log(args,state)},{detached:true,deep:true,flush:"post"})
订阅action的调用Test.$onAction((args)=>{console.log(args)},true)
见下方图

持久化插件
vuex和pinia刷新都会丢失数据
const store = createStore()
const setStorage = (key:string,value:any) => {
localStorage.setItem(key,JSON.stringify(value))
}

const getStorage = (key:string) => {
localStorage.getItem(key) ? JSON.parse(localStorage.getItem(key) as string) : {}
}

typr Option = {
key?:string
}

const defaultPiniaKey:string = 'hao'

const piniaPlugin = (options:Option) => {
return (context:PiniaPluginContext) => {
const { store } = context
const data = getStorage(`${options?.key ?? defaultPiniaKey}-${store.$id}`)
store.$subscribe((args,state)=>{
setStorage(`${options?.key ?? defaultPiniaKey}-${store.$id}`,toRaw(store.$state))
})
return {
...data
}
}
store.use(piniaPlugin({
key:'pinia'
}))

穿插的可视化项目

1

摸鱼神器JSON2TS插件

自动生成ts

新建一个json文件

将返回的数据粘贴里面

滑动至json文件底部 ctrl +alt + v

Router路由

1
2
3
4
5
6
7
8
9
10
11
12
13
14
15
16
17
18
19
20
21
22
23
24
25
26
27
28
29
30
31
32
33
34
35
36
37
38
39
40
41
42
43
44
45
46
47
48
49
50
51
52
53
54
55
56
57
58
59
60
61
62
63
64
65
66
67
68
69
70
71
72
73
74
75
76
77
78
79
80
81
82
83
84
85
86
87
88
89
90
91
92
93
94
95
96
97
98
99
100
101
102
103
104
105
106
107
108
109
110
111
112
113
114
115
116
117
118
119
120
121
122
123
124
125
126
127
128
129
130
131
132
133
134
135
136
137
138
139
140
141
142
143
144
145
146
147
148
149
150
151
152
153
154
155
156
157
158
159
160
161
162
163
164
165
166
167
168
169
170
171
172
173
174
175
176
177
178
179
180
181
182
183
184
185
186
187
188
189
190
191
192
193
194
195
196
197
198
199
200
201
202
203
204
205
206
207
208
209
210
211
212
213
214
215
216
217
218
219
220
221
222
223
224
225
226
227
228
229
230
231
232
233
234
235
236
237
238
239
240
241
242
243
244
245
246
247
248
249
250
251
252
253
254
255
256
257
258
259
260
261
262
263
264
265
266
267
268
269
270
271
272
273
274
275
276
277
278
279
280
281
282
283
284
285
286
287
288
npm init vue#latest
npm init vite@latest //该方式创建时没有router选项
npm install vue-router -s

router/index.ts
import { createRouter,createWebhistory ,RouteRecordRaw} from 'vue-router'
const routes:Array<RouteRecordRaw> = [{
path:'/login',
component:Login | () => import('./Login.vue')
}]
const router = createRouter({
history:createWebhistory(),
routes
})
export default router

main.ts
import router from '..'
app.use(router)

app.vue
router-view
router-link to="/login"

路由模式的变化
vue2 mode => vue3 mode
hash => createHashHistory
history => createWebHistory
abstract => createMemoryHistory

hash模式实现原理是location.hash
location.hash = '/login'
监听左右箭头前进和回退
window.addEventListener('hashchange',(e)=>{console.log(e)})//监听前进和回退

history模式不带#,是基于h5的history实现的
监听左右箭头
window.addEventListener('popstate',(e)=>{console.log(e)})

跳转方式
history.pushState({},'','/login')

编程式导航
{
path:'',
name:'Login',
component:''
}
router-link to="path"
router-link :to="{name:'Login'}"
import { useRouter } from 'vue-router'
const router = useRouter()
@click = () => {
router.push('/login')
router.push({
path:'/login',
})
router.push({
name:'Login',
})
}

不保存历史记录
router-link replace :to="{name:'Login'}" //添加replace以后不保存历史记录
@click = () => {
router.replace('/login')
}
前进和后退
router.go(1) //前进
router.back(1) //后退

路由传参
新的和json2TS差不多的插件=》 json to ts
ctrl + shift + alt + s

@click = (obj) => {
router.push('/login')
router.push({
path:'/login',
query:obj //query只能接收对象
})
router.push({
name:'Login',
params:{} //地址栏不会显示传参信息,params参数存在内存中,因此刷新页面参数会丢失
})
}

在跳转的页面获取传值
import { useRoute } from 'vue-router'
const route = useRoute()
route.params
route.query

动态路由传参
{
path:'/login/:id',
name:'Login',
component:''
}
router.push({
name:'Login',
params:{
id:item.id //和路径后动态的参数名要相同
} //地址栏不会显示传参信息,params参数存在内存中,因此刷新页面参数会丢失
})

嵌套路由
{
path:'/home',
name:'Home',
component:Home,
children:[{
path:'/login', //最后的跳转路径 /home/login
name:'Login',
component:Login,
}]
}

命名视图
命名视图可以在同一级/同一个组件中展示更多的路由视图,而不是嵌套展示,命名视图可以让一个组件中具有多个路由渲染出口。对于一些固定布局的组件非常有用,类似具名插槽,视图默认名称也是default
一个视图使用一个组件渲染,因此对于同个路由,多个视图就需要多个组件
{
path:'/home',
name:'Home',
components:{
default:()=>import(Home),
header:()=>import(Header),
content:()=>import(Content)
}
}

使用时
router-view
router-view name="header"
router-view name="content"

路由重定向,路由别名
重定向方式1:字符串形式
{
path:'/home',
name:'Home',
component:Home,
children:[{
path:'/login', //最后的跳转路径 /home/login
name:'Login',
component:Login,
}]
},{
path:'/',
redirect:"/home", //重定向
}

重定向方式2:对象形式
{
path:'/',
redirect:{
path:'/home'
}
}

重定向方式2:回调函数形式
{
path:'/',
redirect: (to) => {
return '/home'
return {
path:'/home',
params:{
name:'hao' //传参
}
}
}
}

路由别名alias
{
path:'/home',
component:Home,
alias:['/red','/green','/blue'] // 无论访问哪个路由,都是/home
}

导航守卫
全局前置守卫
router.beforeEach((to,next,from)=>{

})

后置守卫
router.afterEach((to,next,from)=>{

})

导航进度条,设置动画
window.requestAnimationFrame()
window.cancelAnimationFrame()

路由元信息
{
path:'/home',
component:Home,
meta:{
title:'首页', //页面标题
nedd:true //是否需要权限
}
}
使用
守卫中
console.log(to) //to中包含meta

路由过渡动效/copy的小满大佬文章
想要在你的路径组件上使用转场,并对导航进行动画处理,你需要使用 v-slot API:
<router-view #default="{route,Component}">
<transition :enter-active-class="`animate__animated ${route.meta.transition}`">
<component :is="Component"></component>
</transition>
</router-view>
上面的用法会对所有的路由使用相同的过渡。如果你想让每个路由的组件有不同的过渡,你可以将元信息和动态的 name 结合在一起,放在<transition> 上:

declare module 'vue-router'{
interface RouteMeta {
title:string,
transition:string,
}
}

const router = createRouter({
history: createWebHistory(import.meta.env.BASE_URL),
routes: [
{
path: '/',
component: () => import('@/views/Login.vue'),
meta:{
title:"登录页面",
transition:"animate__fadeInUp",
}
},
{
path: '/index',
component: () => import('@/views/Index.vue'),
meta:{
title:"首页!!!",
transition:"animate__bounceIn",
}
}
]
})

滚动行为
使用前端路由,当切换到新路由时,想要页面滚到顶部,或者是保持原先的滚动位置,就像重新加载页面那样。vue-router 可以自定义路由切换时页面如何滚动。

当创建一个 Router 实例,你可以提供一个 scrollBehavior 方法

const router = createRouter({
history: createWebHistory(),
scrollBehavior: (to, from, savePosition) => {
记录上个页面滚动至的位置,返回依旧处于那个位置
if(savePosition){
return savePosition
} else {
return {
top:0
}
}
或者
console.log(to, '==============>', savePosition);
return new Promise((r) => { //支持异步
setTimeout(() => {
r({
top: 10000
})
}, 2000);
})
},
scrollBehavior 方法接收 to 和 from 路由对象。第三个参数 savedPosition 当且仅当 popstate 导航 (通过浏览器的 前进/后退 按钮触发) 时才可用。

scrollBehavior 返回滚动位置的对象信息,长这样:

{ left: number, top: number }
const router = createRouter({
history: createWebHistory(),
scrollBehavior: (to, from, savePosition) => {
return {
top:200
}
}


动态路由

暂时到这里了,后面复习一下